Starting with version 0.15, Hermes supports ntfy as a new messaging platform.
In this document I describe in detail
- how to self-host the ntfy server in Docker and expose it via Tailscale,
- how to use ntfy on an iPhone.
A fair question is why you would need yet another messaging platform when you already use Telegram, WhatsApp, and the like. ntfy is not a replacement for these full-featured messaging platforms. While you can send messages to Hermes with it, doing so is not particularly user-friendly. ntfy is a pure notification platform built on the publish-subscribe (pub/sub) paradigm.
In Hermes you can use ntfy:
- as a delivery target for cron jobs,
- to send a notification via
send_message.
You might object: “I can do that with Telegram too.” The advantage of ntfy is that it makes it very easy to send a notification (via HTTP POST or curl), such as alerts on critical infrastructure events (low disk space, events in a build pipeline, and so on).
The goal of this setup:
- iPhone → Hermes: The phone user sends messages to Hermes via one topic, and Hermes replies on a second topic.

- Hermes → iPhone: Hermes pushes messages/replies to a topic, and the iPhone receives them as a push notification.

Two variants are described:
- Without security – no users, anonymous access,
- With two users –
hermesandiphone, each with minimal privileges.
Prerequisites in the Tailscale admin: enable MagicDNS and HTTPS certificates, generate an auth key, and install the Tailscale app on the iPhone.
For the configuration we need the following data:
- the MagicDNS name:
<machine-name>.<tailnet-name>.ts.net; in this guide I use<machine-name> = ntfy - the Tailnet authentication key (auth key,
tskey-auth-…)
All configuration files are also available in the GitHub repository hermes-ntfy-template.
Concepts
Here are the core concepts of ntfy:
1. Topic design and its mapping to Hermes
We use two separate topics so that sending and receiving are cleanly decoupled:
| Topic | Direction | Hermes listens | Hermes sends | iPhone subscribes | iPhone sends |
|---|---|---|---|---|---|
hermes-in |
iPhone → Hermes | ✅ (NTFY_TOPIC) |
– | – | ✅ |
hermes-out |
Hermes → iPhone | – | ✅
(NTFY_PUBLISH_TOPIC) |
✅ | – |
ntfy has no native user identity; the topic name
is the identity. The Hermes integration deliberately does
not use the title field for authorization,
because any sender could forge it. That is why
NTFY_ALLOWED_USERS is just the name of the inbound topic
(hermes-in).
Hermes variables (apply to both setups)
| Variable | Value | Purpose |
|---|---|---|
NTFY_SERVER_URL |
see below | URL at which Hermes reaches the ntfy server |
NTFY_TOPIC |
hermes-in |
Inbound: this is where Hermes listens |
NTFY_PUBLISH_TOPIC |
hermes-out |
Outbound: this is where Hermes replies |
NTFY_ALLOWED_USERS |
hermes-in |
Allowlist = inbound topic name (identity) |
NTFY_HOME_CHANNEL |
hermes-out |
Target for cron/notification pushes |
NTFY_TOKEN |
Setup 2 only | Bearer token or user:pass for auth |
NTFY_MARKDOWN |
true (optional) |
Render replies as Markdown |
The value of NTFY_SERVER_URL depends on how Hermes is
installed:
- Hermes runs directly on the Docker host →
http://localhost:8080 - Hermes runs inside a Docker container →
http://host.docker.internal:8080 - Hermes runs in another container on a different LAN device →
http://<HOST-LAN-IP>:8080
The iPhone reaches the same server via the Tailscale HTTPS URL
https://ntfy.<YOUR-TAILSCALE>.ts.net.
2. Shared Docker base (Tailscale sidecar + ntfy)
Both setups use the same Docker architecture. The Tailscale sidecar provides HTTPS access for the iPhone.
Folder structure
hermes-ntfy/
├── docker-compose.yml
├── .env
└── .ts/
    ├── config/
    │   └── serve.json
    ├── state/
└── .ntfy/
    ├── config/
    │   └── server.yml
    ├── cache/
    └── lib/
docker-compose.yml
Here is the Compose file:
docker-compose.yml
services:

  ntfy:
    image: binwiederhier/ntfy
    container_name: ntfy
    command:
      - serve
    environment:
      - TZ=${TZ}
    user: ${NTFY_UID}:${NTFY_GID} #
    volumes:
      - /var/cache/ntfy:/var/cache/ntfy
      - ./.ntfy/config:/etc/ntfy
      - ./.ntfy/lib:/var/lib/ntfy
    ports:
      - 8080:80
    healthcheck:
      test: ["CMD-SHELL", "wget -q -O - http://localhost:80/v1/health | grep -q '\"healthy\":true' || exit 1"]
      interval: 30s
      timeout: 10s
      retries: 3
      start_period: 10s
    restart: unless-stopped

  tailscale-ntfy:
    image: tailscale/tailscale:latest
    container_name: tailscale-ntfy
    ports:
      - "8080:8080"
    environment:
      - TS_AUTHKEY=${TS_AUTHKEY}         # your Tailscale Auth Key
      - TS_STATE_DIR=/var/lib/tailscale
      - TS_SERVE_CONFIG=/config/serve.json
      - TS_USERSPACE=false
      - TS_HOSTNAME=${TS_NAME}

    volumes:
      - ./.ts/state:/var/lib/tailscale
      - ./.ts/config:/config
    devices:
      - /dev/net/tun:/dev/net/tun
    cap_add:
      - net_admin
      - sys_module
    network_mode: service:ntfy
    depends_on:
      ntfy:
        condition: service_healthy
    restart: unless-stopped
The variables are defined in the .env file:
NTFY_UID=1000      # UID of the host user
NTFY_GID=1000      # GID of the host user
TZ=Europe/Berlin   # your timezone
TS_AUTHKEY=<your-tailnet-auth-key>
TS_NAME=ntfy # the machine name you want - To make sure the volumes on the filesystem are owned by the same
user as the ntfy Docker process, I always set
NTFY_UIDandNTFY_GID. TS_NAMEis the Tailnet machine name; I chosentfyhere, but you can pick any name you like.
./ts/config/serve.json
{
  "TCP": {
    "443": { "HTTPS": true }
  },
  "Web": {
    "${TS_CERT_DOMAIN}:443": {
      "Handlers": {
        "/": { "Proxy": "http://127.0.0.1:80" }
      }
    }
  },
  "AllowFunnel": {
    "${TS_CERT_DOMAIN}:443": false
  }
}
The ntfy server.yml configuration depends on the
setup.
Makefile
I like to wrap the Docker commands in a Makefile.
Makefile
.PHONY: help up down start stop restart logs pull clean status rebuild update sh

.DEFAULT_GOAL := help

help: ## Show this help
    @echo "ntfy Docker Compose commands:"
    @echo ""
    @grep -E '^[a-zA-Z_-]+:.*?## .*$$' $(MAKEFILE_LIST) | awk 'BEGIN {FS = ":.*?## "}; {printf "  \033[36m%-15s\033[0m %s\n", $$1, $$2}'

up: ## Start all containers
    docker compose up -d

down: ## Stop and remove containers
    docker compose down

start: ## Start stopped containers
    docker compose start

stop: ## Stop running containers without removing them
    docker compose stop

restart: ## Restart containers
    docker compose restart

logs: ## Follow logs
    docker compose logs -f

pull: ## Pull newer images
    docker compose pull

status: ## Show container status
    docker compose ps

clean: down ## Stop containers and remove volumes
    docker compose down -v

update: pull down up ## Pull images and restart containers
Setup 1 — No security (no users)
Anyone who knows a topic may read and write it. This is only acceptable because access is restricted to Tailnet + LAN anyway (no public internet).
Here the topic names are the only “secret”.
.ntfy/config/server.yml
base-url: "https://ntfy.<your-tailnet-name>.ts.net"
cache-file: "/var/cache/ntfy/cache.db"
upstream-base-url: "https://ntfy.sh"          # only for iOS!
You may wonder why upstream-base-url points to the
official ntfy server even though we run ntfy locally. This setting is
only required for “iOS instant push notifications”; on Android you don’t
need it. I explain why in the appendix.
Steps
Start the ntfy/Tailscale Docker container:
docker compose up -d   # or
make up

docker compose logs -f tailscale-ntfy
No users or topics need to be created — topics are created automatically on the first publish.
Configure Hermes
(~/.hermes/.env)
NTFY_SERVER_URL=http://host.docker.internal:8080 or  http://<ntfy-host-ip>:8080
NTFY_TOPIC=hermes-in
NTFY_PUBLISH_TOPIC=hermes-out
NTFY_ALLOWED_USERS=hermes-in
NTFY_HOME_CHANNEL=hermes-out
NTFY_MARKDOWN=true
NTFY_MARKDOWN=true means that when sending a
notification, Hermes sets the X-Markdown: true header so
that the mobile clients render the message as Markdown. Only a subset of
the CommonMark specification is supported.
Then:
hermes gateway restartIf you prefer to configure interactively:
hermes setup gateway → select ntfy.
Set up the iPhone
- ntfy app → Settings → Default Server =
https://ntfy.<your-tailnet-name>.ts.net(identical tobase-url). - Subscribe to topic
hermes-out→ this is where Hermes’ replies arrive.
Test receiving
To test delivery first, run this on the host machine:
curl -d "Hello Hermes" http://localhost:8080/hermes-inSending
You can’t send from the iPhone app. There are two alternatives:
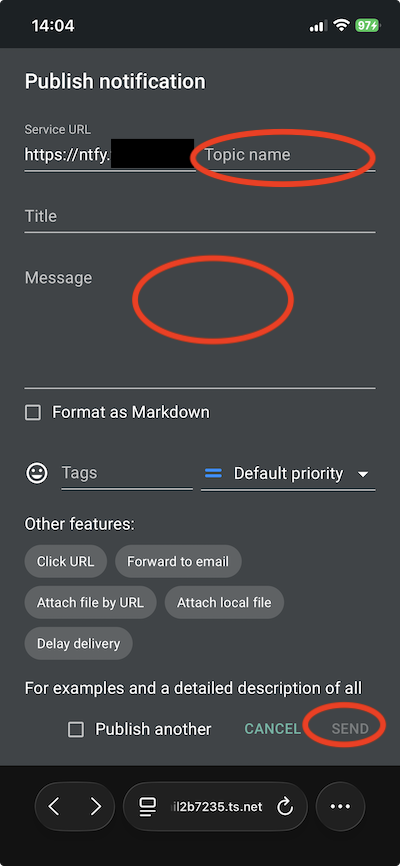
- Open the ntfy web app on the iPhone
(
https://ntfy.<your-tailnet-name>.ts.net)- select
Publish notification - fill in the form and send
- select
- Define a Shortcut on the iPhone
iOS Shortcut for sending
Since the iOS app can’t send, you can build a Shortcut that publishes via HTTP POST.
Building the Shortcut
Shortcuts app → + (new shortcut).
Step 1 – “Ask for Input” (search:
Ask):- Input Type: Text
- Optional Prompt:
Message to Hermes: - The result of this action = the variable “Provided Input”.
Step 2 – “Get Contents of URL” (search:
URL):URL (root, without topic):
https://ntfy.<your-tailnet-name>.ts.net/“Show More” → Method: POST
Request Body: JSON, two fields (each of type Text):
- Key
topic→ valuehermes-in - Key
message→ value: tap → “Select Variable” → “Provided Input”
- Key
The body then looks like this:
{ "topic": "hermes-in", "message": "<your input>" }Only for Setup 2 (with users): in the same action, add under Headers:
Authorization=Bearer tk_YOUR_IPHONE_TOKEN
Save the shortcut and name it, e.g. “Ntfy To Hermes”.
Now you can send a message to Hermes (via topic
hermes-in). You will receive the answer in the ntfy app,
via topic hermes-out.
Setup 2 — With two
users (hermes and iphone)
Now with real access control and minimal privileges per role.
Permission matrix
| User | hermes-in |
hermes-out |
|---|---|---|
hermes |
read-only (listens) | write-only (replies) |
iphone |
write-only (sends) | read-only (receives) |
This way the hermes user can’t “read into” the iPhone
receive topic, and the iphone user can’t forge replies into
the outbound topic.
ntfy/config/server.yml
base-url: "https://ntfy.<your-tailnet-name>.ts.net"
cache-file: "/var/cache/ntfy/cache.db"
auth-file: "/var/lib/ntfy/auth.db"
auth-default-access: "deny-all"               # default: nobody has access
upstream-base-url: "https://ntfy.sh"
Steps
To make the container’s ntfy CLI easier to use from the host, we
define a shell function in .bashrc:
ntfy() {
     docker exec -it ntfy ntfy "$@"
}
Start Docker as in Setup 1:
make up # or docker compose up -dNow we need to create the users:
ntfy user add --role=user hermes
ntfy user add --role=user iphone
You are prompted for the passwords interactively.
Next we need to grant access rights to the topics (ACL):
ntfy access hermes hermes-in  read-only
ntfy access hermes hermes-out write-only
ntfy access iphone hermes-out read-only
ntfy access iphone hermes-in  write-only
We also generate an access token for Hermes:
ntfy token add --label="hermes-gateway" hermes
# Output: token tk_khu5ay7888cahnoyp50iu5dvax3l7 created for user hermes ...
To verify the configuration:
ntfy accessThe output should look like this:
user hermes (role: user, tier: none)
- write-only access to topic hermes-out
- read-only access to topic hermes-in
user iphone (role: user, tier: none)
- read-only access to topic hermes-out
- write-only access to topic hermes-in
user * (role: anonymous, tier: none)
- no topic-specific permissions
- no access to any (other) topics (server config)
Configure Hermes
(~/.hermes/.env)
NTFY_SERVER_URL=http://localhost:8080 or http://host.docker.internal:8080
NTFY_TOPIC=hermes-in
NTFY_PUBLISH_TOPIC=hermes-out
NTFY_ALLOWED_USERS=hermes-in
NTFY_HOME_CHANNEL=hermes-out
NTFY_TOKEN=tk_<hermes-access-token>
Now restart the Hermes gateway:
hermes gateway restart # or docker compose restartSet up the iPhone
The setup works exactly as in Setup 1.
The only difference is that you now have to log in with the username
iphone and its password (the login prompt appears when you
subscribe to the topic).
Testing without Hermes
To test delivery to the iPhone, run this on the ntfy host:
curl -H "Authorization: Bearer <hermes-access-token>" \
     -d "Test notification" http://localhost:8080/hermes-out
To test sending a message to Hermes:
curl -u iphone:<iphone-password> -d "Hi Hermes!" http://localhost:8080/hermes-inThe reply is delivered to the app on the iPhone.
Security comparison
| Aspect | Setup 1 (no security) | Setup 2 (two users) |
|---|---|---|
| Protection against eavesdropping | only via secret topic names | real ACL, read/write separated |
| Who may send to Hermes | anyone who knows the topic | only iphone (write-only on hermes-in) |
| Who may read replies | anyone who knows the topic | only iphone (read-only on hermes-out) |
| Suitability | Tailnet/LAN, non-sensitive data | recommended as soon as sensitive content is involved |
| Effort | minimal | a few extra CLI steps |
Use cases
Hermes
Usage within Hermes is described in detail in the Hermes documentation.
As I noted earlier, it makes little sense to use ntfy as a chat interface to Hermes. If you don’t want Hermes to receive notifications, set the configuration like this:
NTFY_TOPIC=hermes-out
NTFY_PUBLISH_TOPIC=hermes-out
...
and remove NTFY_ALLOWED_USERS from the .env
file.
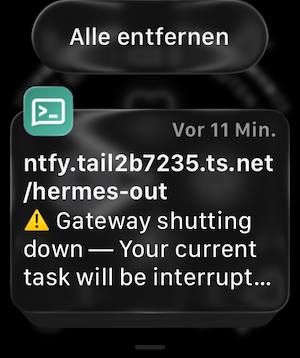
Hermes automatically sends an ntfy notification when the gateway is stopped.
Other use cases
You can find usage ideas on Reddit and in the official ntfy documentation.
Notification on SSH login
You can use ntfy to get a notification for every successful SSH login to a machine.
First we set up a user (sshservice) and a topic
(ssh-login):
ntfy user add --role=user sshservice
ntfy access sshservice ssh-login  write-only
ntfy access iphone ssh-login  read-only
We also need to generate an access token for
sshservice:
ntfy token add --label="ssh service" sshservice
# Output: token tk_khu5ay7888cahnoyp50iu5dvax3l7 created for user hermes ...
On the iPhone, subscribe to the topic ssh-login.
On the machine to be monitored, we create the file:
/usr/local/bin/ssh-notify.sh:
#!/bin/bash
[ "$PAM_TYPE" = "open_session" ] || exit 0
curl -s \
  -H "Title: SSH login on $(hostname)" \
  -H "Priority: high" \
  -H "Tags: warning,key" \
  -d "User $PAM_USER from ${PAM_RHOST:-local}" \
  http://<ntfy-server-ip>:8080/dev/null
Adjust the file permissions:
sudo chmod 700 /usr/local/bin/ssh-notify.shAs the final step, add this line to /etc/pam.d/sshd
after the session lines:
session optional pam_exec.so seteuid /usr/local/bin/ssh-notify.shDone. Now a notification (username and IP address) is sent on every successful login.
Appendix
Use of upstream-base-url
upstream-base-url: "https://ntfy.sh"Why it’s needed
Android apps are allowed to keep a persistent connection open directly to your server, iOS is not. iOS apps can only receive background notifications through Apple’s push service (APNs), and the Apple credentials required for that live in the ntfy.sh infrastructure, not on your server. Your server therefore has to take a detour via ntfy.sh.
How it works
When a message arrives at your server:
- Your server sends a tiny poll request to the
upstream (
ntfy.sh). This contains only the message ID, not the content. - ntfy.sh triggers a push via APNs
- The iPhone wakes up and fetches the actual message directly from your server.
But: no message content travels through ntfy.sh, only the wake-up signal with the ID. The text stays on your server.
This text was originally written in German and translated with AI (Claude Opus 4.8). The animations were created using Moho, without the use of AI.